
The transition from winter to spring can leave us with some very “blah” natural backgrounds to work with, even when the weather starts to warm up. When you are ready to begin your spring sessions, you do not have to wait for the perfect spring like settings to arrive to get great results. In this video, “Winter To Spring ” Photoshop tutorial for portrait photographers, you will see how Summerana instructor Shannon Squires took a drab, lifeless image and turned into a spring beauty!
Here are the steps used to turn a winter portait to spring
Here is a basic rundown of all of the steps used in the video to get to warm up a winter image with Photoshop editing with this Photoshop tutorial for portrait photographers
Lightroom Adjustments:
We will begin by opening our image in Lightroom and making a few adjustments there, then move to Photoshop.
The exposure appears to be good in the original image so we will just leave that alone. However, we need to warm the image up a little by upping our temperature and tint to boost the yellows and magentas just a bit.
We also want to up the blacks just a tad to help with the creaminess of the skin and raise the vibrancy a little.
The last adjustment we will do in Lightroom is to sharpen it up some, using the mask feature to only sharpen in the areas we want. The video shows you how to use this feature if you are unsure. Lastly, we will bump up the luminosity to reduce noise in the image.
These basic lightroom adjustments are quick and easy and give us a good base image to work with. We are now ready to move the image to Photoshop for more in depth adjustments.
Photoshop Adjustments:
The first thing we want to do with this image is move any distractions. In the video, Shannon shows you for the things to look out for, such as hair flyaways, blades of grass that stand out too much, and the bruise on her leg in the original image. The spot healing brush was used for these things in this video and it works great for distractions such as these. In addition to the spot healing brush, the patch tool is also used to help remove some of the other distractions that the spot healing brush can’t really handle, such as blobs of dark areas in the grass or distracting bright spots in the background.
Now that our background is cleaned up pretty good and we have a lot of the distractions gone, let’s focus on the girl.
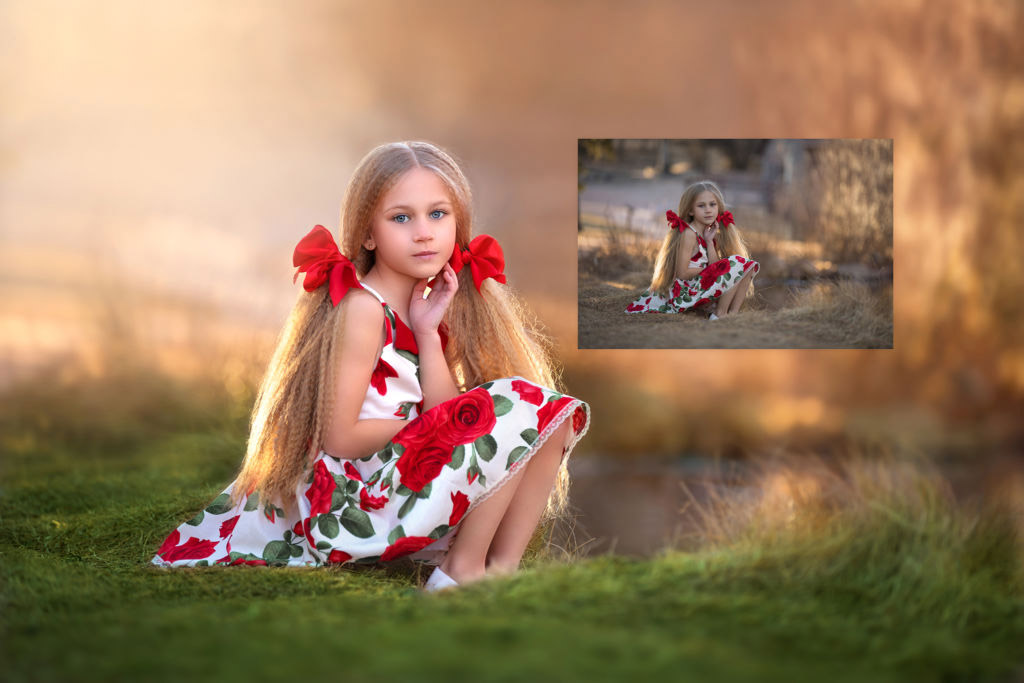
If you will notice in the before image (above), the underside of her thigh is showing a little underneath her dress due to the way she is sitting. To help keep her appearing modest for her age, we want to hide that and “pull” that dress down in that area more. Shannon uses the liquify tool to help extend the dress for a quick, easy fix.
This girl has beautiful epic hair, as you can clearly see! But sometimes working with clients such as this, the hair can appear too over the top in the image. The next step Shannon took was using the liquify tool to kind of reshape her hair and bows a tad to help make it look more toned down. This also helped with the extra flyaways that were left after using the spot healing brush. After these adjustments, you will learn great techniques for making a few other changes to her skin to help smooth it out, remove blotches, brighten her up, etc. by using hand editing tools, rather than Photoshop actions.
Now it’s time to get back to the background. As you can see, the grass in the original images is very bland and has no color. It’s time to bring that dead grass to life by turning it green!
We will start by using the color balance tool to adjust the tones. We want to add more greens, yellows, and cyans to begin with. Next, we will use the curves tool to take out some of the reds and pull in more greens. We will also up the greens and get rid of the blues in the curves panel, which Shannon will guide you through step by step in the video.
Next, we will need to go to the levels panel to slide in more darks to help deepen the grass. Then, we will go into our selective color tool to bring down those magentas even more and bring in more green tones. These adjustment layers will affect the whole image, so we will need to bring all of these adjustment layers together (which is explained in detail in the video), so that we can create a layer mask. Once we create a layer mask, we will invert the layer and then brush these adjustments only on the grassy areas where needed. The great thing about grouping these adjustment layers together and brushing on only where needed, is that after we have done that, we can go back into each individual layer and adjustment them as needed if we aren’t happy with the overall results.
After we are finished getting the background tones the way we want, we will want to warm the little girl up by using a selective color layer again. We will be removing some of the cyan and bumping up the magentas and yellows so she doesn’t appear so “cool.” Again, we will be starting off making adjustments to the whole image, but just concentrate on her skin tone because you will be inverting the layer so that we can mask only where needed. The video goes into more detail on this, as well as making adjustments to highlight her hair and brighten her eyes a bit.
Now, it’s time to blur the background. For this image, we will be using the tilt-shift blur filter. Shannon shows you how to use a combination of liquify tool, tilt-shift filter, and quick select tool to get the perfect blurred background just where we need it. Following these steps will really help your subject stand out without looking like she was just pasted on the image. This is a great technique to use for blurring the background in any of your images.
Lastly, in this Photoshop tutorial for portrait photographers will be using the gradient tool to help bring some extra glow around the areas where the natural light hits her hair in the original image. Using the gradient tool, you can create somewhat of an orb or glow that is coming towards her, which will look natural because the highlights in her hair are already there.
Once we have everything how we want it, we can go back in using multiple tools to remove any distractions you may have missed, add a little warmth, and do a final sharpen. Here is the result after all of the adjustments made in the step by step video:
The tips and tools that Shannon goes into detail about in the video are not only perfect for changing your winter images to spring, but, they are great for images of any season in any location. Knowing hand editing techniques such as these will really help you step up your editing game and help you create wonderful images for your clients that will leave them feeling satisfied with these results. This video is a great start for learning some simple basic techniques to help you step up your editing game.
Find spring inspiration for all your upcoming portrait sessions here.
We cant wait to see how you use this Photoshop tutorial for portrait photographers, show us your edits in our supportive community within our Facebook group!