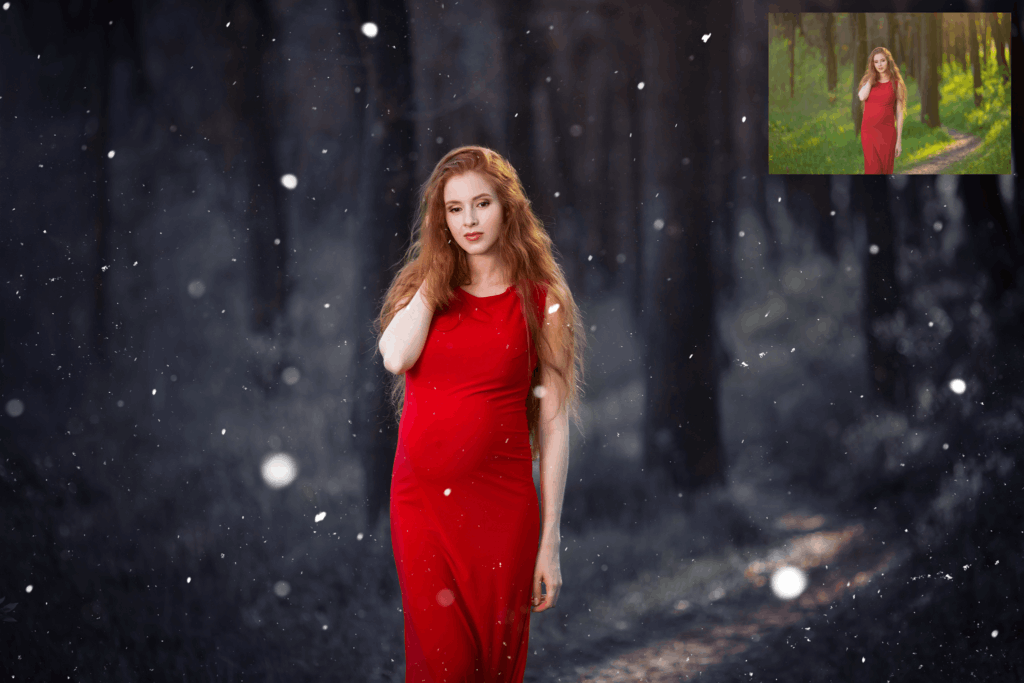
Having your own winter wonderland photoshoot is a real dream for many photographers. All of your clients will want it, and the images always look fantastic for Christmas cards and seasonal portraits.
But there are a lot of downsides to snowy shoots. First of all, they are cold – very cold. That can cause problems with redness in your subjects’ faces and can make children grumpy. A sudden blizzard might derail your photoshoot rather than helping it, and your equipment can easily be damaged through contact with wet snow.
That’s even for those of us who are lucky enough to have access to snow in the winter – which certainly isn’t true all around the world!

So, how can you create a winter wonderland theme without having to put up with all of those problems? The answer is simple: do it in Photoshop.
It’s easy to make it happen when you use Summerana’s snow overlays, brushes, and Photoshop actions in her Summerana Membership. Best of all, you can get some snow for free – just hang on to the end with us to find out how!
Set the tone
The first thing that you will want to do is to make it look like your magical winter portrait was actually taken in the wintertime. It’s no good trying to add snow to an image which is filled with green leaves and blooming flowers! Instead, you need to tone it down a bit and make the air seem crisp and cold.
There are many different winter tones to use in the Summerana’s snow collections. Using these Photoshop actions and brushes, you can completely change your images tones, which will really help to create that winter feeling. Try them all out and decide which you like best – it only takes a couple of clicks to get them all set up.
You can also adjust these layers as much or as little as you want. You can change their opacity to make them more or less dramatic, and you can even use a paintbrush to remove the coloring from some parts of the image.
These tones will put your image firmly into the wintertime. But even when the mood is set up, you still need to create that frosty air which is perfect for the first snowfall. So, how do you do that?
See a few examples here (the snow before/afters):
No more greens
One of the best ways to turn a fall or summer image into a wintertime one is to pay attention to the plant life. Trees and grass look different depending on the season, especially when there is a touch of frost in the air.
The Winterize my Grass, Winter Scenery, and Color Cast Remover actions and brushes are all set up to create that wintery look just for the grass and trees in your image. This is really important in order to have that authentic feel. Paint this layer over the areas where your greens are. You will quickly find that it makes a big difference to the overall feel of your image!
Such a small and simple step really doesn’t seem like it would be so important. But when it comes to winter scenes, we instinctively know when something doesn’t look quite right. We can tell the difference between summer greens and winter greens, even if we wouldn’t be able to describe it in words!
Winter Play Collection:
Let it snow
Now it’s time to add some snow. Isn’t this the best part? It’s so fun when you see the first snows of the year coming down, as it always feels so magical. Now, you can recreate that delight in your photograph with the help of a bit of Photoshop sorcery.
There are a couple of options you can use here, and you can even combine them. One of them is the WinterizeMe Snow Applicator. Just as it says on the tin, this action and it’s brushes come together to help you to apply snow all over your image. You can paint it on in as large or small a brush as you like, getting the right effect depending on whether you want the snow to appear close to the camera or far away.
When you have finished painting your snow on, there are lots of ways to adjust it and to really make it perfect. You can blur your snow out, or make it look like a real blizzard is coming down. You can also erase parts wherever you like to bring out other elements of the image, such as your subject’s face.
The other choice you have here is to use our real snow overlays. These overlays are images of real snow that have already been perfectly captured for you, and which are ready to add onto your photograph.
WinterizeMe Collection as shown by RGB Productions:
They can still be as unique as you like. You can edit the overlays in a large number of ways using the snow actions that come along with them, and of course you can play around with your own tools as well to see what happens. There are lots of overlays to choose from with different kinds of snowfalls, so you can go with the look that suits your image.
All of this can be done in just a few clicks, so you don’t have to worry about figuring out settings or finding where all of those elusive menu options are.
Just like that, you’ll be done – with a winter wonderland image that your clients will love.
Now that you can see how it’s done, why don’t you try it for yourself? Click here to claim a free mini snow overlay and action collection and get started!
Pingback: Weekly Top Ten – Childhood - Summerana - Photoshop Actions for Photographers
Well explained post.