
THIS IS A GUEST POST COURTESY OF JON PHILLIPS OF CONTRASTLY: Jon Phillips is an enthusiast photographer and the founder and owner of Contrastly, a site whose mission is to help photographers all around the globe improve their craft and learn new skills. They create unique Lightroom & ACR presets, Photoshop actions, ebooks, and video courses and also publish a popular blog with instructional articles, reviews, and tutorials.
Adobe Lightroom Classic is one powerful piece of software. It has evolved throughout the years and a myriad of features have been added (and keep being added regularly.)
As you work with Lightroom, you’ll quickly notice how some of those features see more use than others. There are a few that you definitely should familiarize yourself with. Let’s get started, shall we?
1. Import > Copy/Add/Move

The Library module in Lightroom Classic is where all the importation happens. In other words, this is where you’ll import, catalog, and categorize your images.
One crucial step when importing images is deciding whether you want to copy (or copy as DNG), add, or move them. When you’re in the Import window, you will see those 4 options at the very top of the screen.
If the image files are coming from an outside source like a camera or an external drive, you will notice you only have two options to import the photos: copy as a DNG or copy. If the files are already stored on your computer’s hard-drive, then you’ll have the additional options of move or add.
- Copy as DNG: This option creates a virtual copy of your image, imports it into Lightroom, and then converts it to an Adobe DNG2 image file.
- Copy: This creates a virtual copy of the image file and then moves it into Lightroom without converting it to a DNG.
- Move: This will essentially take your image files from their current location and then move them into a new location. Once a file is moved, it won’t be in its original location anymore.
- Add: Selecting “Add” will keep your files in their original locations and Lightroom will work with the image file without making a physical copy.
2. Library > Quick Develop
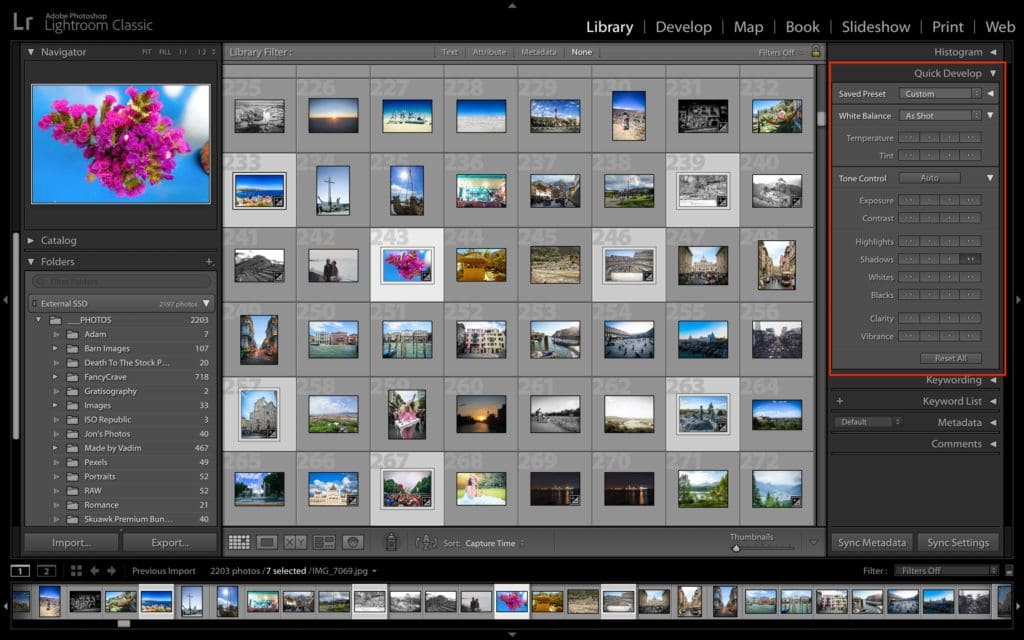
Once you have images imported into Lightroom Classic, it’s time to get your photo editing hat on. If you’re familiar at all with Lightroom, you know that this usually happens in the Develop module.
But, before you dive into the Develop module, you can apply a few adjustments using the Quick Develop panel on the right side of the Library module.
You might think that this is overkill, but imagine you have a few hundred images from a wedding for example. You can select a series of images in the Library, and apply the exact same adjustments to all of them in one go. Talk about easy batch processing!
3. Library > Collections
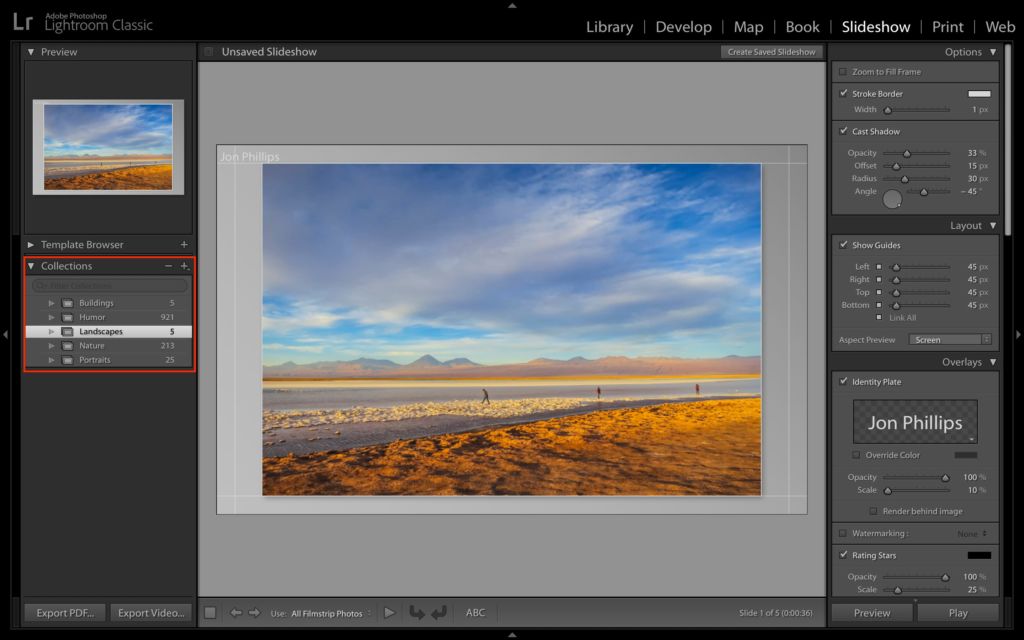
Having your images all categorized and organized in the Library module is great. It allows you to quickly find the photos you’re looking for. But, when you then move on to the Develop module — or any of the other modules, really — there’s just no easy way to view your categorized images without going back to the Library module or using the film strip at the bottom of the Develop module.
That’s a lot of back and forth and it does not make for a very consistent workflow. Instead, use Collections!
If you don’t see the Collections panel in the left-side panel, right-click in the panel and select Collections to enable it.
When you place images into collections in the Library module, you can then access that exact same panel in every single module. In fact, it’s the only panel that’s in everything single module in Lightroom Classic!
4. Develop > Histogram
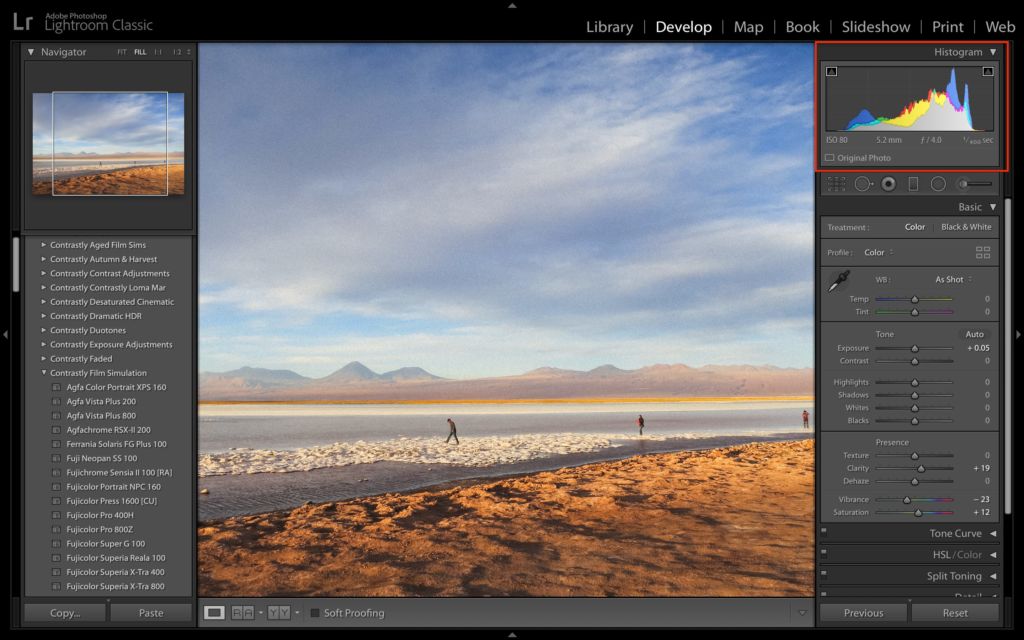
Unfortunately, one of Lightroom’s most useful features is one that is often ignored and abandoned.
I’m talking about the Histogram. The Histogram (in the Develop module) is a visual representation of the colors and tonal ranges in your image.
The Histogram allows you to very quickly determine if an image is too bright or too dark. You can also rapidly see if your image is balanced.
If you look closely, you’ll notice some small triangles in the top left and right corners of the Histogram. Those will turn the shadow and highlight clipping indicators on or off. Shadows that have lost detail will appear in blue in your image, whereas blown highlights will appear in red.
5. Develop > Graduated Filter
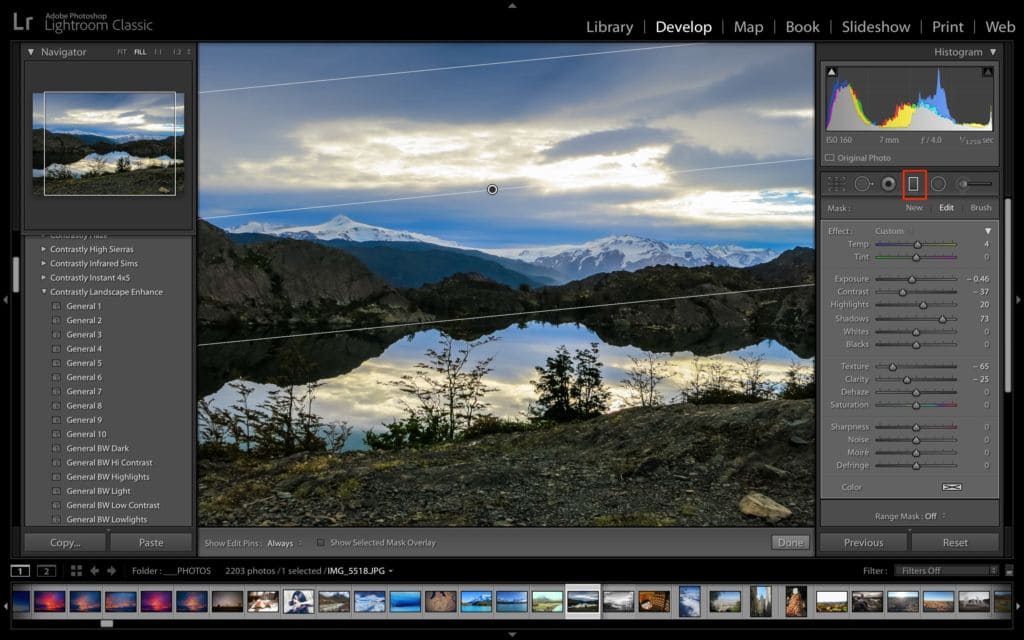
In the world of landscape photography, photographers often rely on tools such as graduated neutral density filters (GND) to properly expose the foreground and the sky.
A GND filter is a physical filter that you can buy and attach to your lens to control how much light will hit your camera’s sensor. The great thing about these filters is that they are graduated, meaning they go from 100% transparency to a darker transparency. This can be extremely useful when you’re exposing a scene against a very bright sky.
But, you don’t have to run off to the store to buy a plethora of ND or GND filters. Well, you could, and you’d probably love using them. But, you can achieve similar effects using Lightroom’s Graduated Filter.
Right underneath the Histogram in the Develop module is a small bar that contains a few icons. The 4th one from the left is the Graduated Filter.
Clicking on it will allow you to draw where to place the filter on your image. For example, if your image has a very bright sky that needs to be tamed a little bit, have your Graduated Filter (GF) cover the sky. Then simply adjust the exposure, highlights, contrast, and even the temperature and tint.
You can even place multiple Graduated Filters on the same image. Simply click on “New” and repeat the process.
6. Develop > Adjustment Brush
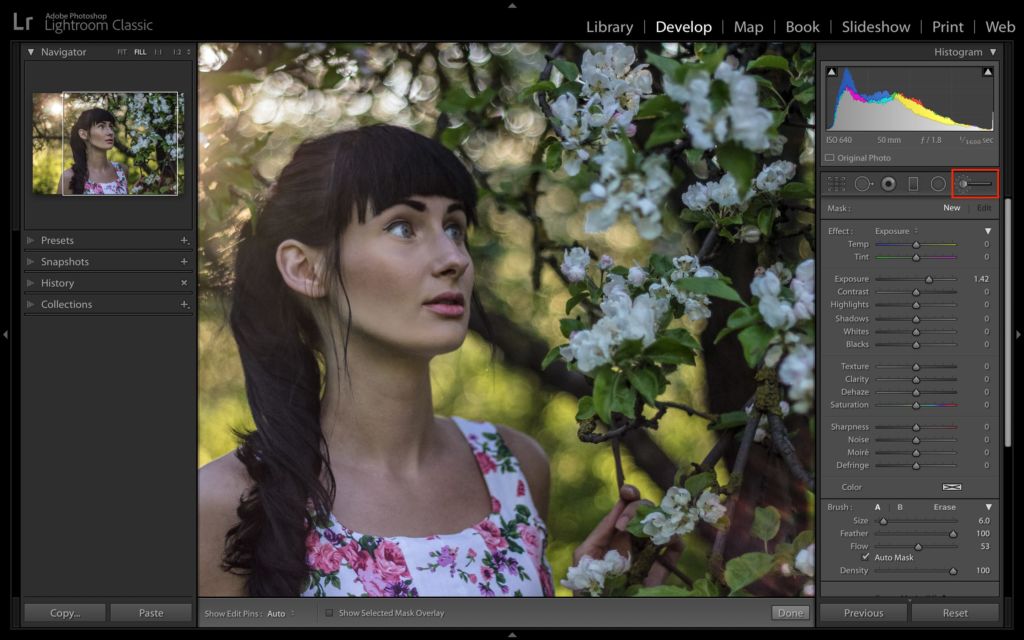
Let’s stay in that same section underneath the Histogram. The very last icon on the right (it looks like a wand, a slider, or a microphone on its side), is the Adjustment Brush.
Clicking it will open up a host of adjustment sliders. The Adjustment Brush can be used to “paint” over parts of your image and apply adjustments only to the areas you’ve painted over.
For example, if you would like to brighten up your subject, you could paint over it and then adjust the exposure and clarity. The great thing about the Adjustment Brush is that you can apply adjustments either before or after you “paint” on your image. I personally prefer to make a small adjustment before I paint so I can more easily see the effects and then fine tune afterward. Your mileage may vary, but it’s such a useful and versatile tool for quickly fine-tuning parts of an image without applying general adjustments that affect the entirety of your image.
7. Develop > Transform
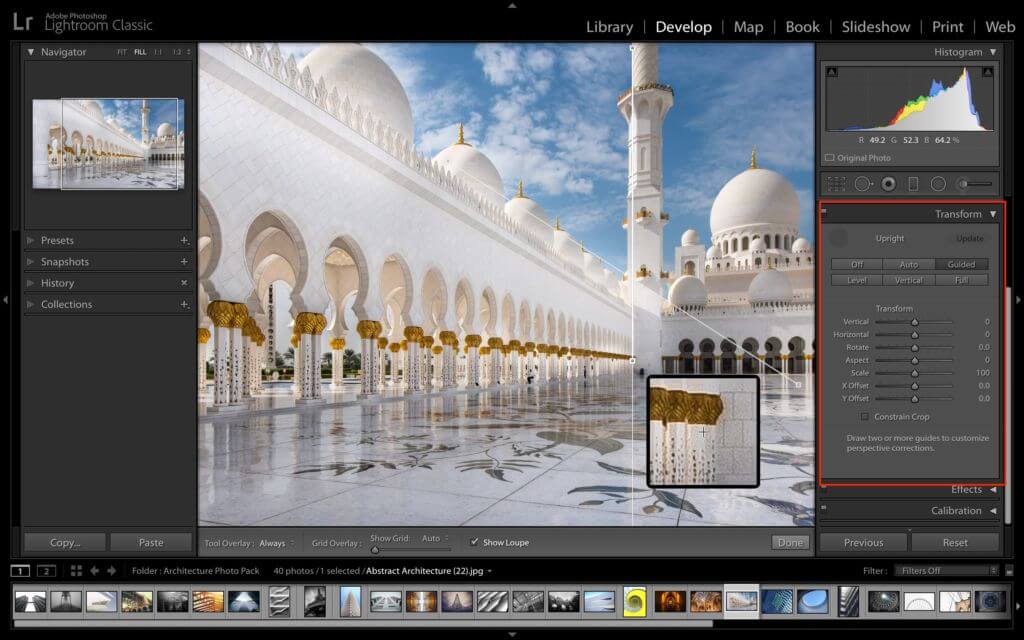
Still in the Develop module, let’s move on to the Transform panel. If you shoot landscapes, architecture, or any other subject that requires straight lines, this is a panel you will find yourself using time and time again.
This panel enables you to manipulate the perspective in your images.
There are 6 main options: Off, Auto, Guided, Level, Vertical, and Full.
Underneath those buttons, you will see a few sliders.
Those sliders allow you to tweak the changes made by the buttons mentioned above or used on their own to gain total control over the transformation of your image and can even allow you to adjust the tilt and shift of your images very easily.
8. Develop > HSL Panel

The HSL panel is often misunderstood. Those 3 letters stand for Hue, Saturation, and Luminance. In this panel you can selectively control every visible aspect of every color which make up your images.
The panel is split into 2 main sections: HSL and Color. Depending on which version of Lightroom Classic you use, you may also see a Black & White option (yes, it even allows you to convert your photos to fully adjustable black and white images!).
If you do not see the B&W option, simply hit the V key on your keyboard to convert your image to a black & white version and you will see the HSL/Color panel change to a Black & White Mix array of sliders.
Now, it’s important to understand the difference between Hue, Saturation, and Luminance. Those terms are often used interchangeably (and incorrectly so) in photography circles.
- Hue: think of hue as all the colors of the rainbow. I’m talking all the primary and secondary colors of the color wheel. Hues that are complementary to one another are direct opposites on the color wheel. Think of it this way: is the green in your image more of a blue-ish green or does it seem to border more on the yellow side of things?
- Saturation: the saturation of a color is the degree of its hue. This is determined by the amount of gray in a color. In other words, while hue is the actual color itself, saturation differs in that it tells us how deep a specific hue appears to our eyes. Saturation is often misinterpreted for Vibrance. If you hear a client say they want more or less vibrant colors, they likely mean more or less saturated colors.
- Luminance: this one is relatively easy. Luminance is the perceived brightness of a color. This can help you a great deal when you’re looking to selectively adjust the brightness of colors within an image. It will not only bring out details but also add impact to your photo by isolating certain colors through increased or decreased luminosity.
Conclusion
Of course, there is a lot more you can learn about Lightroom Classic. After all, it is packed to the brim with modules, panels, sliders, and tools, but hopefully you learned a few things.
Don’t be afraid to experiment in Lightroom Classic. Remember, all your editing is 100% non-destructive and you can always resets everything if you’re not satisfied with the results. Happy editing!
Lightroom Mastery:
Are you tired of spending hours on end fiddling around in Lightroom Classic and not getting the results you know you should be getting?
The Lightroom Mastery ebook will show you how to use Lightroom Classic to its full potential; not by droning repetitions of someone else’s editing style, but through teaching you the basic premises of the software using easy to understand, real-world language that will unlock your potential for learning.
