This is a Guest Post courtesy of Tara Lesher Photography.
So you finally finished editing your image to perfection using Lightroom and you want to share it with everyone on social media and distribute it to loved ones in print.
There is just one problem.
When you go to post and print your image, it doesn’t look right. Your picture-perfect image appears blurry and compressed online and the print version is poor quality.
Has this ever happened to you?

It can be frustrating when we spend so much time and energy editing every detail of an image only to have it come out looking like a pizza slice that got stuck to the box top when we go to share it.
Learning how to properly export your image from Lightroom can make a world of difference when it comes time to publicizing it.
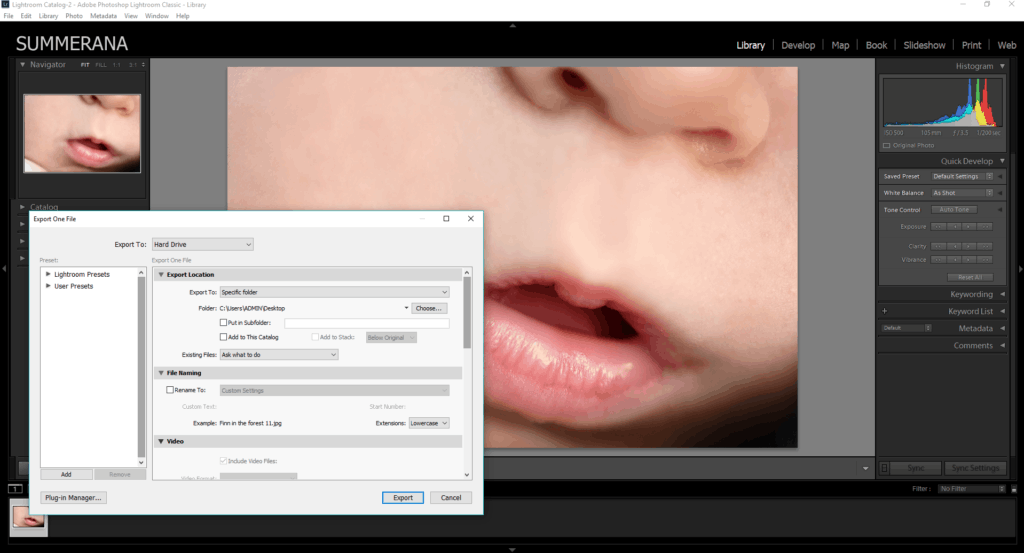
The following are a few tips on how to export your Lightroom photos so they glow online and on paper like a freshly crowned beauty queen. All settings will be found on Lightroom’s export dialogue box.
From Lightroom to Online:

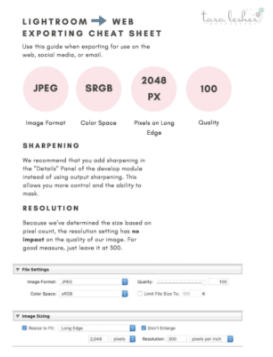
File Settings– For website and social media sharing, your Image Format should be set to JPEG, Color Space selected as sRBG, and Quality fixed at 100. Note that Facebook and Instagram will automatically compress your image to a lower quality, but leaving the Quality at 100 is still recommended, especially if you plan to share your photo via email or Flickr. Also, be sure to leave the “Limit File Size To” box unchecked.
Image Sizing– When sizing your image for online display, check the “Resize to Fit” box and select “Long Edge” from the drop-down menu. Then set the pixel count to 2,048. Note that since you’re setting the pixel size, the resolution you choose won’t make a difference. It only matters if you set it to export by pixels per inch, so you can disregard the Resolution and leave it at its default setting if you already set the sizing to pixels. Check the “Don’t Enlarge” box because you don’t want your image to be automatically expanded.
Output Sharpening– Do any image sharpening directly in the “Detail” section in Lightroom, not from the export dialogue box. This way you have more control over what parts of your photo get sharpened instead of letting the entire image become automatically, and possibly disproportionately, sharpened.

From Lightroom to Print:

File Settings– The File Settings for exporting your image for print will be the same as those for exporting for online: Image Format= JPEG, Color Space= sRGB, and Quality=100.
Image Sizing– For print images, leave the “Resize to Fit” box unchecked. Next, set the Resolution to 300 and select “pixels per inch” from the drop-down menu. Use the chart below as a guide by matching your camera’s resolution to your desired print size. Make sure the image’s overall resolution gives you at least 150 DPI. You can get away with a lower DPI depending on how far the viewing distance is.

(Image source: www.photographyicon.com)
Output sharpening– As mentioned before, sharpen your image manually instead of in export mode to get the best result.
Soft-proofing– While these are basic settings for exporting your Lightroom-edited photo to print, you want to make sure you use soft-proofing before you send your images off. Soft-proofing enables Lightroom to simulate what your image will look like on paper. You can read more about soft-proofing here.

If you follow these few simple Lightroom exporting tips, you’ll be able to share your gorgeous photos in all their glory both online and in print.
Watch Grace Pamela do a walkthrough in Lightroom on how to import and export your images here:
And download Tara’s cheat sheet: Download Cheat Sheet
