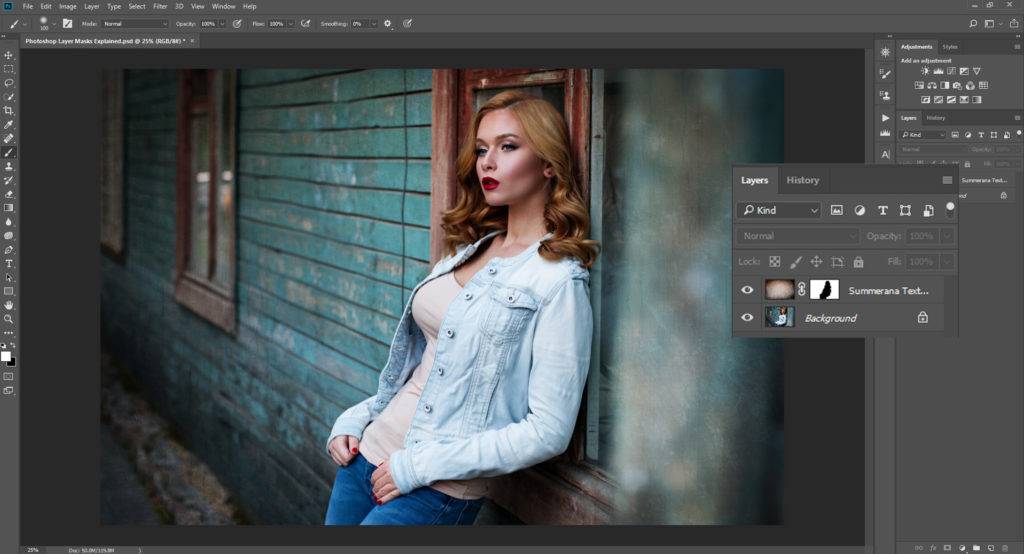
One of the things you often see us talking about when explaining Photoshop techniques is layer masks. If you are new to using Photoshop and haven’t had much experience in the interface, you may be totally lost as to what this means. Today we’re telling you everything that you need to know about layer masks, so you can start using them with confidence!

Image edited using texture overlays available in the Summerana Photoshop Membership
What is a layer mask?
Let’s start from the very beginning. A layer mask is applied to a layer, and always has to be attached to a layer. In other words, you can’t have a layer mask if you don’t have a layer.
To put it in the simplest possible terms, a layer mask allows you to apply an effect to only a certain portion of your image.
This can mean many things and can be used in many ways, as you can probably expect. The versatility of layer masks is part of what makes them so useful – and even better, they are also very easy to use once you understand them.
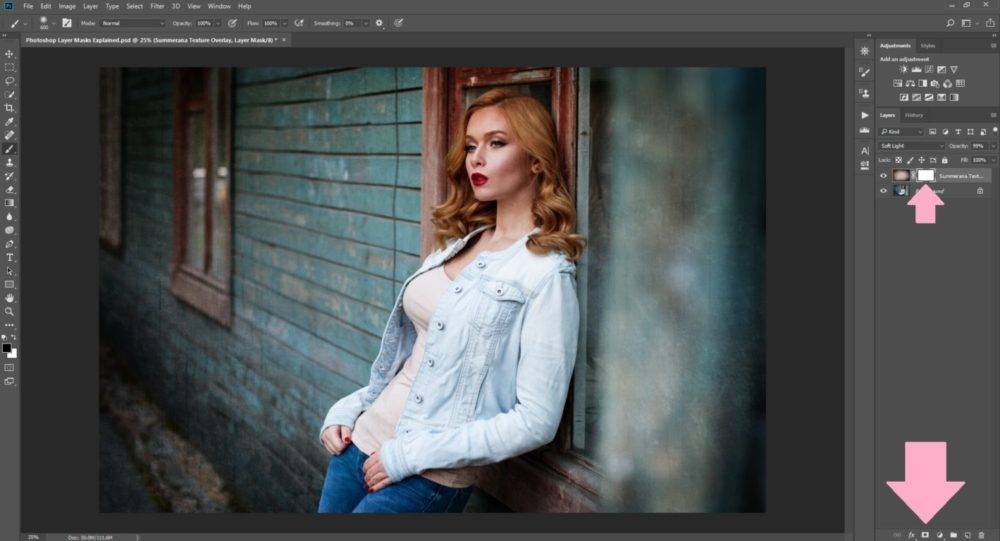
You will identify a layer mask when you see a white or black box pop up next to your layer image in the layers panel. It usually appears with a tiny graphic of a linked chain in-between the two.
In order to create a layer mask, you will need the layer mask button: this is located at the bottom of the layer mask panel and looks like a box with a circle inside of it.

When should you use layer masks?
Generally speaking, a layer mask is used for when you want to do something to a section or part of your image rather than the whole image at once. For example, if you wanted to lower the opacity of a layer, you can simply use the opacity tool to do that. If, on the other hand, you wanted only the top part of the layer to have a lower opacity, then you would need to use a layer mask.
With a layer mask, you can change something on part of your layer or part of your image while leaving the rest just as it was before. This is really useful for more complex edits, for adding overlays and effects, and for making edits that are non-destructive.
When you think you have made a mistake in your layer mask, you can easily put it right again without having to delete all of your changes since that mistake occurred. That makes it very useful if you aren’t sure about how to edit an image, too.
How do you use the layer mask?
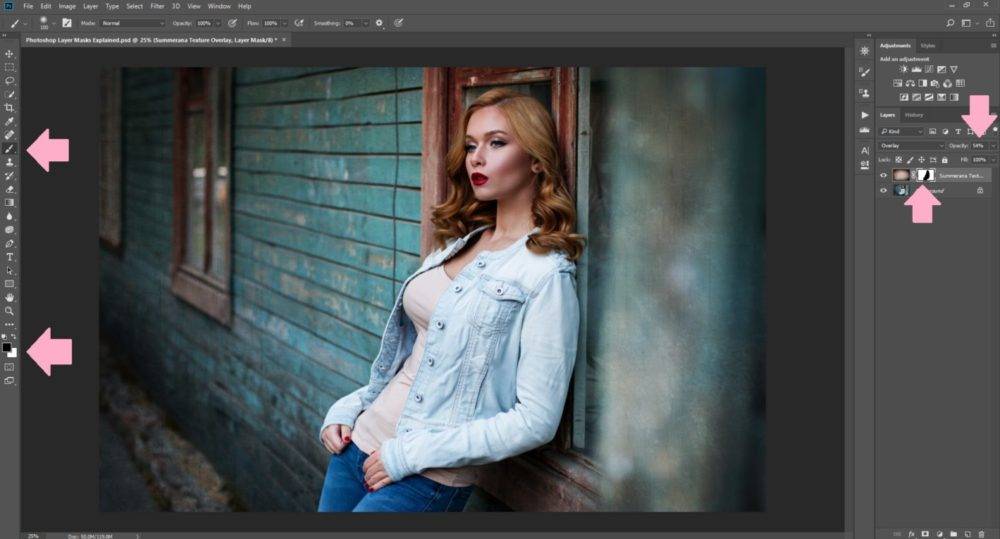
When using a layer mask, you are going to paint on the areas that you want to edit. To do this, set your brush colors to black and white, and then select the layer mask. It will likely be either solid black (completely hidden) or solid white (completely visible) when you start.
In order to make some changes, just use the opposite color for your brush. Use a black brush to paint on a white layer mask to conceal that layers effect, or a white brush to paint on a black layer mask to reveal its effect.
If you haven’t selected the layer mask first, you will simply be drawing on your layer – not the effect that you want. Once you select the mask, however, you can watch the magic happen in front of your eyes.
Note that you don’t have to use a solid brush to paint on the layer mask. If you increase your brush softness, you will have a softer effect around the area you are painting – usually this is better for editing photographs as it makes it harder to see the edits. You can also decrease the opacity of your brush. This will create shades of grey on your layer mask, which allow the layer to have areas of different opacity.

How do you deal with complex objects?
When dealing with complex objects, it is really difficult to create a layer mask by painting. For example, you might be trying to add a new background to a photograph of a cat, putting in a new sky in a wooded area, or changing something behind your subject’s hair. These have complex edges which are difficult to draw over, or even select with the magic wand tool.
In order to get accurate edges, one technique is to start with changing your channel. Go into your channels palette, usually just along from the layer panel, and select the channel which gives you the most contrast in the area you need to work on. An ideal image would have your foreground in white and your subject totally in black, or vice versa. However, a bit – or even a lot – of grey is fine.
Next, make a copy of this channel. Then use CTRL or Command with L to bring up your levels adjustment (or hit the levels button in your toolbar). Use this tool to darken your shadows and midtones to try and get as much black as possible. Zoom in to check your edges – you’re looking to get perfect edges more than you are looking to get perfect black. As before, some greys are fine.
Now, use the dodge tool to darken highlights and the burn tool to darken shadows. Go around your whole image until you have a lot of detail visible. If you’re lucky with your image choice, it might take only a couple of minutes to get to a good stage.
For the final step in preparing the layer, use the invert option to change your colors around so that your foreground – the thing you want to keep – is white.
Hold down CTRL or Command and click on your channel. Now, return to your original layer and press the new mask button (the circle inside a square). This should create a new layer mask which works on the original layer, therefore isolating your subject just the way you wanted!
Use the layer menu and find matting, the color decontaminate. This dialogue box allows you to reduce any halos left on the edges of your image. Always work on a copy with this tool as it is destructive.
Want to see most of these tidbits in action? Watch Grace Pamela’s video tutorial where she shows you everything you need to know about layer masks here:
Helpful shortcut tools:
- Press the ALT or OPTION key on your keyboard and then click your layer mask to preview what your layer mask looks like without your image visible.
- Press the BACKSLASH \ key on your keyboard to preview where you painted on your layer mask with your image visible (this is helpful if you want to be sure you didn’t miss any spots)
- Press SHIFT or COMMAND on your keyboard and then click your layer mask to temporarily disable your layer mask.
- Press the letter ‘D’ on your keyboard to reset your colors back to default (black and white) so you don’t have to manually open your color picker box to select black or white to use for painting in your layer masks.
- To turn your layer mask into a selection, click CTRL or COMMAND to select your layer mask.
- If you want to duplicate your layer mask and place the same layer mask onto another layer effect, you can hold ALT or OPTION on your keyboard and drag the layer mask to your other layers. It will ask id you want to replace that layer mask (if there is already a layer mask applied) select ‘yes’. This helps to speed up your workflow, for example, you may have taken a long time to perfectly paint your layer mask over your subjects hair but now you have to do it all over again for another effect you wanted to add. Instead of doing it all over again, you can instead duplicate your layer mask to the new effect to save time.
- Select your layer mask then select CTRL I or COMMAND I on your keyboard to invert your layer mask. For example, if you have a white layer mask it will show the effect. By inverting that layer mask, you can quickly hide the effect by inverting it to white instead of black.
- To remove your subject from the background, or a similar effect, click your layer and use the magic wand or quick selection tool to select your subject. Then once you have your selection, click “add layer mask.” This will turn your selection into a new layer mask and help speed up your compositing. You can inver this layer mask, depending on which area you want as your layer mask.
That’s our guide to layer masks in full. What other topics are you struggling with? Let us know in the comments!
awesome tutorial explained well and did not move to fast many thanks now to have a go many thanks for sharing this information
I’m so glad it was helpful! <3
Thank you for writing this down as well. The video was great and the text is also such a great help!!
Pingback: Photoshop Layer Masks Explained